Cloudflare Turnstile: A Privacy-First CAPTCHA Alternative for Forms, Login Pages, and Self-Hosted Apps

I have never met anyone who likes CAPTCHA puzzles. They are the kind of web friction we all tolerate because the alternative is usually worse: spammed contact forms, fake signups, password reset abuse, and bots hammering anything that accepts input.
That is why Cloudflare Turnstile is worth a serious look. It is Cloudflare’s privacy-focused CAPTCHA alternative. The goal is simple: confirm that a request probably came from a real human without making every real human click pictures of buses.
This guide walks through how I would add Turnstile to a real website or self-hosted app. Not just the widget. The full pattern: frontend widget, backend validation, production checks, and the parts people usually miss.
Quick Answer
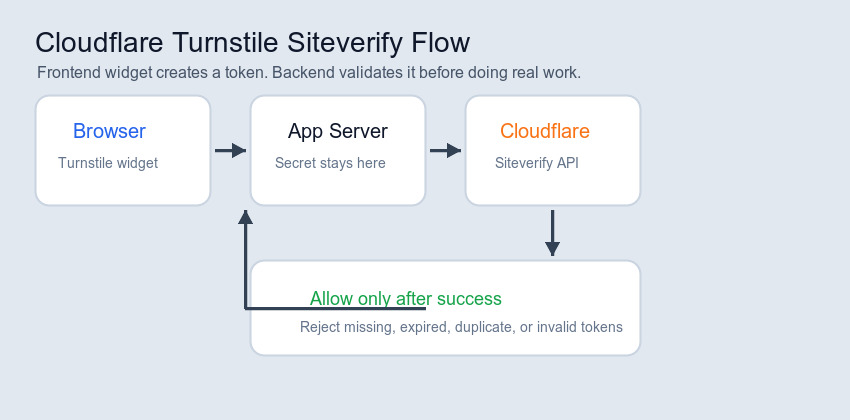
Cloudflare Turnstile is a CAPTCHA alternative for forms, login pages, and other public actions. You add a small widget to the page, the visitor’s browser gets a short-lived token, and your backend validates that token with Cloudflare before accepting the request.
The important part is the backend validation. A Turnstile widget by itself is not protection. It only creates a token. Your server still has to send that token to Cloudflare’s Siteverify endpoint and reject the request if validation fails.
Cloudflare can run non-interactive browser checks, use managed challenge behavior, and adapt what happens depending on the visitor. In many cases the user sees little or nothing. That is the whole appeal.
Useful official references:
- Cloudflare Turnstile overview
- Turnstile client-side rendering docs
- Turnstile server-side validation docs
- Turnstile Privacy Addendum
- Turnstile testing docs
Why Bother?
Classic CAPTCHA solved a real problem, but it also created another one. The worse the bot traffic gets, the more annoying the challenge becomes. Then real users get punished for trying to send a message, create an account, or log in.
That is painful on mobile. It is worse for accessibility. It is also bad for conversion. If a visitor wants to contact you and the form blocks them with a bad puzzle, the security tool has become part of the problem.
Turnstile is built around a better default:
- Fewer annoying puzzles for legitimate users.
- Less form spam from simple bots and scripted submissions.
- Better accessibility than many image-based CAPTCHA systems.
- A privacy-focused model compared with tracking-heavy alternatives.
- Easy deployment if you already use Cloudflare Pages, Workers, DNS, WAF, or Tunnel.
Turnstile is especially interesting for self-hosted applications. If you expose services through Cloudflare Tunnel, like in my guide on deploying secure applications with Cloudflare Tunnels and Docker Compose, Turnstile gives you another lightweight protection layer for public forms and login screens.
What We Are Building
For this post, imagine a simple contact form. The same pattern also works for login pages, newsletter signups, quote requests, comments, and small admin tools.
The flow looks like this:
- Visitor opens the form.
- Turnstile runs in the browser and creates a token.
- Form submits that token with the normal form fields.
- Backend sends the token to Cloudflare.
- Cloudflare returns success or failure.
- Backend processes the form only after success.
That last line matters. If validation fails, the form should not send email, create a user, start an automation, hit a webhook, or do anything expensive.
Prerequisites
You do not need a complicated stack for Turnstile, but you do need a few things in place:
- A Cloudflare account.
- A domain or hostname where the widget will run.
- A public sitekey from Cloudflare Turnstile.
- A private Turnstile secret key stored on the backend.
- A server, serverless function, Cloudflare Worker, Pages Function, or API route that receives the form.
If your site is static, that last requirement is the one to pay attention to. Jekyll can render the form, but Jekyll cannot validate the token after the site is built. You need something server-side for that.
That is the same kind of split I use when thinking about static sites on Cloudflare Pages. The site can stay static and fast, while the dynamic part lives in a small function. I wrote about the deployment side in Deploy a Jekyll Website to Cloudflare Pages using GitLab CI.
Step 1: Create a Turnstile Widget
Start in the Cloudflare dashboard and create a Turnstile widget. Cloudflare will give you two values:
sitekey: public, safe to put in HTML.secret: private, must stay on the backend.
For most sites, I would start with the managed widget. It lets Cloudflare decide whether the visitor needs an interactive challenge or whether the browser can pass quietly. Invisible mode is useful for some flows, but I prefer starting with visible managed behavior because it is easier to debug and easier to explain to users.
Cloudflare’s official docs cover the options here:
- Cloudflare Turnstile overview
- Turnstile client-side rendering docs
- Turnstile server-side validation docs
- Turnstile Privacy Addendum
- Turnstile testing docs
Step 2: Add Turnstile to the Form
For a normal static form, implicit rendering is the easiest option. Load the exact Cloudflare script and add a cf-turnstile element inside the form.
1
2
3
4
5
6
7
8
9
10
11
12
13
14
15
16
17
<script
  src="https://challenges.cloudflare.com/turnstile/v0/api.js"
  async
  defer
></script>

<form action="/contact" method="POST">
  <label for="email">Email</label>
  <input id="email" name="email" type="email" required>

  <label for="message">Message</label>
  <textarea id="message" name="message" required></textarea>

  <div class="cf-turnstile" data-sitekey="YOUR_SITE_KEY"></div>

  <button type="submit">Send</button>
</form>
When the widget sits inside the form, Turnstile adds a hidden field named cf-turnstile-response. That hidden field contains the token your backend needs.
Do not proxy or cache the Turnstile script. Cloudflare explicitly documents the script URL as:
1
https://challenges.cloudflare.com/turnstile/v0/api.js
Use that URL directly. If you cache or rewrite it, you can break the security model or end up running stale code.
For React, Vue, modals, or forms rendered after page load, use explicit rendering instead. Cloudflare exposes functions like turnstile.render(), turnstile.reset(), turnstile.getResponse(), and turnstile.remove(). That is useful when the form does not exist when the page first loads.
Step 3: Validate the Token Server-Side
This is the part that matters most. The browser token must be sent to Cloudflare from your backend. Never trust the client by itself.
Here is a minimal JavaScript example:
1
2
3
4
5
6
7
8
9
10
11
12
13
14
15
16
17
18
19
async function validateTurnstileToken(token, remoteIp) {
  const formData = new FormData();
  formData.append("secret", process.env.TURNSTILE_SECRET_KEY);
  formData.append("response", token);

  if (remoteIp) {
    formData.append("remoteip", remoteIp);
  }

  const response = await fetch(
    "https://challenges.cloudflare.com/turnstile/v0/siteverify",
    {
      method: "POST",
      body: formData,
    }
  );

  return response.json();
}
Then your form handler should validate before doing anything useful:
1
2
3
4
5
6
7
8
9
10
const token = formData.get("cf-turnstile-response");
const result = await validateTurnstileToken(token, visitorIp);

if (!result.success) {
  return new Response("Verification failed. Please try again.", {
    status: 400,
  });
}

// Send email, create account, start workflow, or process the form here.
The same pattern works in Express, Fastify, Hono, Next.js, Astro, Flask, Laravel, Rails, Go, or a Cloudflare Worker. The framework does not matter. The order matters.
Validate first. Process second.
Step 4: Know the Token Rules
Turnstile tokens are intentionally short-lived. Cloudflare documents three important limits:
- Tokens are valid for 300 seconds.
- Tokens are single-use.
- Tokens can be up to 2048 characters.
If a visitor opens a form, walks away, and submits it later, the token may be expired. If a bot tries to replay one token many times, Cloudflare should reject the duplicates. Your backend needs to handle both cases cleanly.
If validation fails, show a simple retry message and reset the widget. Do not show raw Cloudflare error details to normal users. Log enough for debugging, but do not log the secret key or full tokens.
Step 5: Test Before Going Live
Testing is where small Turnstile mistakes show up quickly. Before shipping, test these paths:
- A normal successful form submission.
- A missing
cf-turnstile-responsefield. - An expired token.
- A duplicate submission using the same token.
- A backend request with the wrong secret.
- A submission from a hostname that should not be allowed.
Cloudflare provides testing keys, so use them before switching to production keys. I also like to log the error-codes array from failed Siteverify responses during development. It makes configuration mistakes obvious.
In production, keep the user-facing error boring: “Verification failed. Please try again.” That is enough. The detailed error belongs in your logs.
Where Turnstile Makes Sense
I would consider Turnstile anywhere a public user can trigger work on your server:
- Contact forms that are getting spammed.
- Login pages that see credential stuffing attempts.
- Password reset forms that can be abused for enumeration or email flooding.
- Newsletter signup forms.
- Checkout or quote request forms.
- Comment forms on blogs or documentation sites.
- Public webhook-style endpoints that need a browser-originated human action.
- Admin pages exposed through a tunnel or reverse proxy.
That last point matters for homelab setups. I often write about self-hosted applications, including self-hosted n8n with Docker and Cloudflare Tunnel. If you publish a tool like n8n, a dashboard, or an internal form to the internet, think in layers: authentication, rate limits, access rules, logging, and bot checks where they fit.
Turnstile is not a replacement for login security. It does not replace MFA. It does not replace Cloudflare Access. It does not make a vulnerable app safe. It just reduces one class of automated abuse before the request reaches the expensive part.
Production Checklist
Turnstile is easy to add, which means it is also easy to add badly. Before calling it done, I would check these items:
- Validate the token on the backend for every protected request.
- Store the secret key in environment variables or a secret manager.
- Never send the secret key to the browser.
- Reject missing, invalid, expired, and duplicate tokens.
- Check the
hostnamereturned by Cloudflare when possible. - Use the
actionfield for different forms, such aslogin,contact, ornewsletter. - Rate limit sensitive endpoints even when Turnstile is enabled.
- Log validation failures, but do not log secrets or full tokens.
- Use HTTPS for every production form.
- Test with Cloudflare’s testing keys before going live.
The action check is underrated. If you use one widget on a login form and another on a contact form, the backend can verify that the token was generated for the expected action. That helps prevent tokens from one workflow being reused in another.
Turnstile and Jekyll
A Jekyll website can display the Turnstile widget just fine. The static page can load the script, render the widget, and submit the token. The validation still has to happen somewhere else.
That backend can be small:
- Cloudflare Pages Function.
- Cloudflare Worker.
- Serverless function on another platform.
- Small API container behind Cloudflare Tunnel.
- Existing backend already receiving form submissions.
For a Jekyll site hosted on Cloudflare Pages, I would usually reach for a Pages Function first. The blog stays static. The form handler becomes the only dynamic part. This keeps the site fast while still giving you real server-side Turnstile validation.
A common setup looks like this:
- Jekyll builds static pages.
- Cloudflare Pages hosts the site.
- A Pages Function receives
/contactsubmissions. - Turnstile protects the form.
- The function validates the token with Siteverify.
- Valid submissions are sent to email, a database, or an automation workflow.
That architecture keeps the website simple while still blocking a lot of low-effort spam.
Turnstile vs reCAPTCHA
The obvious comparison is Google reCAPTCHA. reCAPTCHA is well known and widely supported, but many site owners dislike the UX and privacy tradeoffs. Turnstile is compelling because it focuses on low-friction verification and can work without forcing traffic through Cloudflare’s CDN.
I would summarize the decision this way:
- Choose Turnstile when you want a modern CAPTCHA alternative with a cleaner user experience.
- Choose Turnstile when privacy and accessibility matter to your audience.
- Choose Turnstile if you already use Cloudflare for DNS, Pages, Workers, Tunnel, WAF, or bot protection.
- Keep defense in depth for high-risk endpoints, because no CAPTCHA replacement is enough by itself.
For most personal sites, small business sites, developer tools, and self-hosted apps, Turnstile is the option I would reach for first.
Common Mistakes
The biggest mistake is treating the widget as the security control. It is not. The widget creates a token. Backend validation is the security control.
Other common mistakes:
- Accepting a form when the token is missing.
- Validating the token after already processing the expensive action.
- Reusing tokens across multiple requests.
- Forgetting that tokens expire after five minutes.
- Caching or proxying
https://challenges.cloudflare.com/turnstile/v0/api.js, which Cloudflare warns against because the script must be fetched from the exact URL. - Showing raw validation errors to users instead of a simple retry message.
- Forgetting to reset the widget after an expired or failed submission.
If the user leaves a form open for a long time, the token may expire before submission. In that case, call turnstile.reset() and ask the user to try again. That is cleaner than silently dropping the form or accepting an unverified request.
Performance and User Experience
Security tools affect SEO indirectly. A spammed contact form does not directly lower rankings, but bad page experience and broken forms definitely hurt the value of the traffic you already have.
This is where Turnstile makes sense for blogs, documentation sites, SaaS landing pages, and small business websites. You can protect the action without putting a heavy challenge in front of every visitor.
The best implementation is boring:
- Keep the form crawlable and accessible.
- Load the Turnstile script only where needed.
- Use clear labels and normal HTML form behavior.
- Keep error messages human-readable.
- Monitor spam rate, conversion rate, and validation failures after launch.
Do not hide important content behind a challenge. Use Turnstile to protect actions, not to block readers from reading public pages.
Final Thoughts
Cloudflare Turnstile is not exciting because it adds a widget. It is exciting because it removes friction from a security pattern that users have learned to hate. A good bot protection layer should be quiet for real visitors and annoying for automated abuse. Turnstile gets closer to that balance than traditional CAPTCHA.
If you run contact forms, login pages, public admin tools, or self-hosted applications, start with a simple Turnstile integration and validate every token server-side. Then add the rest of the boring production controls: rate limits, logs, authentication, authorization, and monitoring.
That is the real pattern: Turnstile is one layer. Used properly, it is a very useful one.