Kali Linux on Raspberry Pi 4 with 4in touch screen case
I recently purchased a Raspberry Pi 4 to play with its new features and decided to make it a dedicated Kali linux ethical hacking device with a 4 inch touch screen case kit I got off Amazon for pretty cheap.
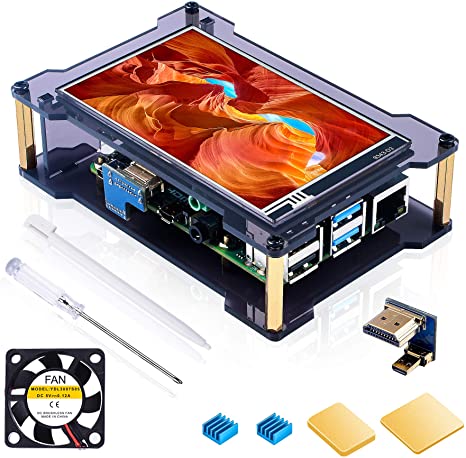
The case in question with the screen, case, fan and Raspberry Pi 4
Setting up the device with Kali Linux and Drivers
Since the instructions guide you to a pre-made Kali linux image you burn on your SD card and that it’s an old version of Kali Linux and because I don’t trust pre-made images, I decided to install the latest from the Kali Linux’s website and install drivers manually. Turns out it’s not really plug and play (as they say on Amazon).
After some research on the device, I stumbled upon install scripts for these screens that ends up into a kernel panic every time. Nice.
Then I stumbled on this Git repo from a guy that fixed the original scripts and someone that pretended it to work on Kali 2020. Still ended up into a kernel panic for me on Kali 2021…
The solution (for me) to install the screen drivers on Kali Linux 2021
For this, I used my Mac, Nmap, an SD card reader and Balena Etcher. You might need to adjust your subnet accordingly.
Tweaked the steps some more and ended up with this:
- Burn the latest disk image from the Kali Linux website to SD card (I used balenaEtcher with the “kali-linux-2021.1-rpi4-nexmon-64.img.xz” image)
- Remove and re-mount SD Card, copy the config.txt file in there on your computer and create a blank file named “ssh” in there
- Eject SD card and put it in the raspberry pi
- Run Nmap to see you current network devices (update your subnet if needed):
1
sudo nmap -sn 192.168.0.0/24
- Before plugging the usb power into the Rpi, plug your ethernet cable and
- Wait 5 minutes if you have no other screens attached (like me) or until you get a login prompt if you do
- Run Nmap again, find the one for the raspberry pi and ssh into it (password will be “kali”):
1
ssh [email protected]
- Install this library:
1
sudo apt install xserver-xorg-input-libinput
- Clone the repo:
1
git clone https://github.com/danielcshn/LCD-show-kali.git
- run the LCD-show-kali script, mine was:
1
sudo ./MPI4008-show 180
- when it asks to reboot, hit ctrl+c and power off the Raspberry Pi instead:
1
sudo poweroff
- once the ACT light (green) on your Raspberry Pi stops flashing, remove usb power
- remove your SD card from your Rpi and plug it back in your computer
- open the config.txt file on the boot partition that’ll show up, delete everything above the last section and replace with the whole original config.txt file you copied earlier (step 2). I replaced everything above this:
1
2
3
4
# If you would like to enable USB booting on your Pi, uncomment the following line.
# Boot from microsd card with it, then reboot.
# Don't forget to comment this back out after using, especially if you plan to use
# sdcard with multiple machines!
- Eject the SD card and put back in your Raspberry Pi and power it up
- Screen should work along with touch
The config.txt file that worked for me
1
2
3
4
5
6
7
8
9
10
11
12
13
14
15
16
17
18
19
20
21
22
23
24
25
26
27
28
29
30
31
32
33
34
35
36
37
38
39
40
41
42
43
44
45
46
47
48
49
50
51
52
53
54
55
56
57
58
59
60
61
62
63
64
65
66
67
68
69
70
71
72
73
74
75
76
77
78
79
80
81
82
83
84
85
86
87
88
89
90
91
92
93
94
95
96
97
98
99
# For more options and information see
# http://rpf.io/configtxt
# Some settings may impact device functionality. See link above for details

# uncomment if you get no picture on HDMI for a default "safe" mode
#hdmi\_safe=1

# uncomment this if your display has a black border of unused pixels visible
# and your display can output without overscan
#disable\_overscan=1

# uncomment the following to adjust overscan. Use positive numbers if console
# goes off screen, and negative if there is too much border
#overscan\_left=16
#overscan\_right=16
#overscan\_top=16
#overscan\_bottom=16

# uncomment to force a console size. By default it will be display's size minus
# overscan.
#framebuffer\_width=1280
#framebuffer\_height=720

# uncomment if hdmi display is not detected and composite is being output
#hdmi\_force\_hotplug=1

# uncomment to force a specific HDMI mode (this will force VGA)
#hdmi\_group=1
#hdmi\_mode=1

# uncomment to force a HDMI mode rather than DVI. This can make audio work in
# DMT (computer monitor) modes
#hdmi\_drive=2

# uncomment to increase signal to HDMI, if you have interference, blanking, or
# no display
#config\_hdmi\_boost=4

# uncomment for composite PAL
#sdtv\_mode=2

#uncomment to overclock the arm. 700 MHz is the default.
#arm\_freq=800

# Uncomment some or all of these to enable the optional hardware interfaces
#dtparam=i2c\_arm=on
#dtparam=i2s=on
#dtparam=spi=on

# Uncomment this to enable infrared communication.
#dtoverlay=gpio-ir,gpio\_pin=17
#dtoverlay=gpio-ir-tx,gpio\_pin=18

# Additional overlays and parameters are documented /boot/overlays/README

# Enable audio (loads snd\_bcm2835)
dtparam=audio=on

# USB mass storage boot is available on Raspberry Pi 2B v1.2, 3A+, 3B, and 3B+ only.
#program\_usb\_boot\_mode=1

\[pi2\]
# Pi2 is 64bit only on v1.2+
# 64bit kernel for Raspberry Pi 2 is called kernel8 (armv8a)
kernel=kernel8-alt.img
\[pi3\]
# 64bit kernel for Raspberry Pi 3 is called kernel8 (armv8a)
kernel=kernel8-alt.img
\[pi4\]
# Enable DRM VC4 V3D driver on top of the dispmanx display stack
#dtoverlay=vc4-fkms-v3d
#max\_framebuffers=2
# 64bit kernel for Raspberry Pi 4 is called kernel8l (armv8a)
kernel=kernel8l-alt.img
\[all\]
#dtoverlay=vc4-fkms-v3d
# Tell firmware to go 64bit mode.
arm\_64bit=1

# If you would like to enable USB booting on your Pi, uncomment the following line.
# Boot from microsd card with it, then reboot.
# Don't forget to comment this back out after using, especially if you plan to use
# sdcard with multiple machines!
# NOTE: This ONLY works with the Raspberry Pi 3+
#program\_usb\_boot\_mode=1
hdmi\_force\_hotplug=1
hdmi\_force\_edid\_audio=1
dtparam=i2c\_arm=on
dtparam=spi=on
enable\_uart=1
display\_rotate=3
max\_usb\_current=1
config\_hdmi\_boost=7
hdmi\_group=2
hdmi\_mode=1
hdmi\_mode=87
hdmi\_drive=2
hdmi\_cvt 480 800 60 6 0 0 0
dtoverlay=ads7846,cs=1,penirq=25,penirq\_pull=2,speed=50000,keep\_vref\_on=0,swapxy=0,pmax=255,xohms=150,xmin=200,xmax=3900,ymin=200,ymax=3900