Wireguard VPN at home with AWS and EdgeRouter X

So you want to use a VPN for your internet at home but classic VPN providers seem slow or you would like to use a Wireguard VPN for all devices on your network? Here’s how to do it without the headaches and config puzzles I had for the past month.
For this project, you’ll need an Ubiquiti Edge Router X, an Amazon Web Services (AWS) account, an internet connection, a computer and an hour ahead of you. If all goes well, by the end of this blog you’ll be browsing on your new self-hosted VPN.
What’s a Virtual Private Network (VPN)?
A Virtual Private Network (VPN) is basically a way to connect over the internet to another location and make it so that it looks like you’re on site through the use of an encrypted tunnel. The classic use case for a VPN in a business environment would be work from home. With a VPN you can connect to the office from anywhere in the world with an internet connection and work like if you were in the office on a normal day. Fun stuff.
Virtual Private Networks have been around for a while now. So much so that even non-tech people know what a VPN is now. Most people will tell you it’s the thing that makes Netflix think you’re in another country so that you can watch more shows. It’s much more than that but it’s good enough for most home use cases. What happens is you connect to a remote location in another country and access the internet from there. Netflix can’t know that so it serves you that country’s selection.
Why use Wireguard VPN?
Even though there is a lot of ways to create an encrypted tunnel and access a remote location through it, the OpenVPN system is probably the most used. It’s easy to use, shown to techs at school and compatible out of the box with many consumer-grade routers. So much so that most public VPN providers like NordVPN or CyberGhost use it for that reason by default (they provide a Wireguard mode from what I saw online though). If your router says “VPN support” on the box, it most likely means “OpenVPN support”.
The problem with OpenVPN is that it was created in 2001. Back then most people were not streaming 4K movies on their phones and were especially not downloading their MP3 song on Limewire with their 56k dial-up modem through a public VPN provider. Of course, it was and still is enterprise grade. Of course it’ll work if you set it up on your router.
Ok, so OpenVPN is widespread, been there for 20+ years and works out of the box on almost anything. Why would I want to have a hard time configuring Wireguard then? I have Netflix shows to watch right now!!
The main reason to use Wireguard instead is speed. The thing with OpenVPN is that it’s based off old tech. Wireguard VPN takes a modern approach to how VPNs should work today and applies it in a sexy, light and modern fashion. Most people at home won’t see the difference in speed at home as Wireguard usually 58% faster than OpenVPN. Here’s how it looks on my 100/30 connection at home.
 Speedtest with Wireguard VPN
I don’t have a screenshot from before when I was running my own OpenVPN server on AWS, but from what I recall it was more like 35Mb/s download and 12Mb/s upload on the same internet connection. That didn’t bother me as much as the uptime of the VPN connection that kept on dying overnight. That was the main reason why I searched for alternatives to OpenVPN and stumbled upon Wireguard.
Why host my own Wireguard VPN server on AWS?
Now that you have a better idea of what a VPN does and why you might want to go with Wireguard instead of OpenVPN, you might wonder why someone would want to go through setting up your own server. For me, there’s 2 reasons for it: peace of mind and knowledge.
Peace of mind because I know for a fact that I’m the only one using this server and that no one is logging requests on it so that they can resell them. Knowledge because I learned a lot through this process and that enabled me to use it at work. Win win if you ask me!
If you’d rather use a provider, I’ve seen great reviews from Mullvad VPN. Cloudflare also uses the Wireguard protocol for WARP if you want to have a look at that.
Setting up the Wireguard VPN server on AWS
First thing you’ll need is an Ubuntu 20.04 LTS server running on AWS using a EC2 instance with an elastic IP address attached to it. If you don’t know how to do this, here’s a great guide on how to deploy one.
Some notes to take into account for your EC2 instance:
- Take note of the Elastic IP you created. It’ll be your VPN server IP.
- Open a public port for Wireguard (UDP 51820 by default, could be 54321 or something else if you’d like) and SSH (TCP 22 by default). If you don’t go with defaults, note them as you’ll need them during the config process later on.
- Choose a server closest to you if you only want privacy (faster), or somewhere else if you want geographic privacy as well. I live near Montreal so I went with ca-central-1 which is in Montreal, Qc, Canada.
- Save that PEM key file somewhere safe when asked to, you’ll need it to log into your server.
Now that you have your server up and running on AWS, connect to it using SSH (using this guide if you have no idea how). Awesome, you’re in your own soon-to-be VPN server!
Configuring the Wireguard server on Ubuntu 21.04 LTS
Awesome, you’re loggued in your Linux server right now and excited.
Update the system
First thing to do on all new installs is to update everything. Let’s do that.
In the command prompt, type in this command:
1
sudo apt update && sudo apt upgrade -y
Wait for it to do its thing and reboot using this command:
1
sudo reboot
Wait a minute and try logging back in using the same command you used before with your PEM key. When you’re in, read on.
Install some utilities we’ll need
On my linux machines, I usually use some basic tools for everything. These include some tools to run stuff while logged out with screen, see CPU and memory usage with htop and editing files with my favorite editor: Vim. They’re usually there now by default but I like to make sure they are. Another tool we’ll need to install Wireguard later on is Git.
To install all that good stuff you can type in this command and wait for it to complete:
1
sudo apt install -y htop vim screen git
Now, let’s enable automatic security updates:
1
sudo dpkg-reconfigure --priority=low unattended-upgrades
Good, let’s go.
Install the Wireguard server on your AWS EC2 instance
2023-11-14 Update
I prefer using this pprometey/wireguard-install script now that enables you to install everything on most servers as easily.
All right, here comes the fun part: installing Wireguard on your Ubuntu linux server. There’s many ways to go about this but I really like those Wireguard scripts made by Alexey Chernyavskiy that make the server setup as well as managing VPN clients super easy. Let’s install them right now!
First step, download the scripts using Git and go into the directory:
1
git clone https://github.com/pprometey/wireguard_aws.git wireguard_aws && cd wireguard_aws
Now, let’s run the install script that’ll take care of everything:
1
sudo ./initial.sh
If you didn’t change the default Wireguard port when you were configuring your EC2 instance on AWS, you’ll basically just hit enter and accept default settings for all questions. When asked for a “VPN user name”, I entered ‘router’.
Once you’re done, it’ll show you a QR code and some config info. Copy it somewhere as we’ll use the info to configure our router. It’ll look somewhat like this:
1
2
3
4
5
6
7
8
9
10
11
[Interface]
PrivateKey = <something>
Address = <your vpn client IP>/32
DNS = 1.1.1.1

[Peer]
PublicKey =  <something>
PresharedKey = <something>
AllowedIPs = 0.0.0.0/0, ::/0
Endpoint = <your vpn server IP>:<your vpn server port>
PersistentKeepalive=25
Let’s see if you’re good to go by checking the status of your wireguard server:
1
sudo wg show
Blocking unwanted ports on your server
Now that our Wireguard server is up and running, let’s block ports to secure our server a little more. To do so, we’ll use UFW with a basic config as follows:
1
2
3
4
5
6
7
sudo apt update
sudo apt install ufw -y
sudo ufw default deny incoming
sudo ufw default allow outgoing
sudo ufw allow ssh
sudo ufw allow <your vpn server port>/udp
sudo ufw enable
Adding a VPN client for other devices (optional)
Now that you have a Wireguard router up and running, let’s create a client so that we can connect to it. Using another script, simply enter this command and answer a few questions. I named mine “router”.
1
sudo ./add-client.sh
One cool thing with this is you’re now your own VPN provider which means you could use it on your phone or on your computer while not at home if you’d like. To do so, simply create another client using the same add-client.sh script.
This time, if you want to configure your phone, iPad or computer (when not at home) to connect to your VPN, you can use the QR code it gives you by scanning it using the Wireguard app for Android, iOS MacOS, Windows, etc.
On your phone: Just scan the QR code and enable the connection.
On your computer: Just copy the Interface/Peer settings below the QR code, save it to a .conf file and import it into the Wireguard app.
If you did connect your phone, you can check your VPN connections on your server with the command:
1
sudo wg show
Configuring your Edgerouter X to forward all traffic to your VPN
Now that we have a free AWS EC2 Ubuntu instance running our Wireguard server and a client created for our router, let’s configure our Ubiquiti Edgerouter X so that all traffic going out of our house does it through our own VPN. To do so, I inspired myself of this tutorial on Reddit.
Basic router configuration
If you’re like me, you probably are already running the ER-X right now with some basic config inspired by the “Basic Setup” wizard. If you just used the defaults, nothing to do here. If not, you might need to alter the commands a little bit to make this config work.
On my end, I’m using everything default on there except these 2 things:
- I’m using Pi-Hole as a DNS server. It already forwards to Cloudflare’s DNS.
- I already configured the router’s and DHCP’s DNS to go to Pi-Hole so all devices already use it.
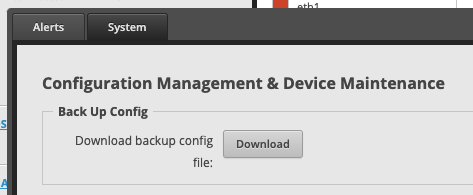
Backing up your router configuration might be a good idea at this point just in case something goes wrong. You can do so in the configuration panel of the web interface:
SSH into your Ubiquiti Edgerouter X
First, you’ll need to SSH into your router. If you don’t know how to SSH into something, follow this guide. The command should look something like this followed by your password:
1
ssh <admin user>@<router ip>
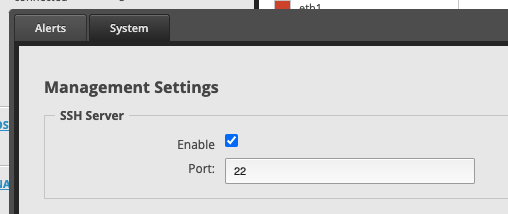
If it says access denied or something similar when trying to connect, make sure SSH is enabled through your web admin interface and try again:
Installing Wireguard on your Edgerouter X
In order to run Wireguard on your Edgerouter, you’ll need to install the Wireguard packages for our Edgerouter X. Our specific model is the e50 v2 so let’s go ahead and download that onto our router. You’ll want to follow the install instructions for that URL as provided in their readme.
Here’s the right one for me at the time of writing these lines:
1
curl -OL https://github.com/WireGuard/wireguard-vyatta-ubnt/releases/download/1.0.20210606-1/e50-v2-v1.0.20210606-v1.0.20210424.deb
Once downloaded, let’s install it:
1
2
sudo dpkg -i e50-v2-v1.0.20210606-v1.0.20210424.deb
rm e50-v2-v1.0.20210606-v1.0.20210424.deb
Configure the wg0 Wireguard interface
Now that we have Wireguard installed on our router, we’ll need some way to send all that traffic to Wireguard. To do that, we’ll create a virtual interface on the router that will do just that. This way, instead of sending traffic to a physical ethernet cable, we’ll send it through that “wireguard cable”. Did it make sense? Anyways, let’s do it.
Before we begin, get back to that client config you copied before when configuring the server. Here’s a mapping of the placeholders you’ll see in the next paragraphs:
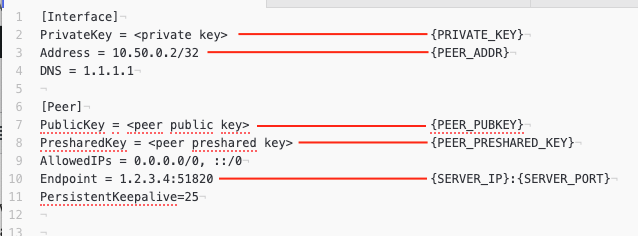
Wireguard config file placeholder mapping
First we need to save 2 files with the keys to our VPN server somewhere on our router. Here’s what to do and where:
1
2
3
4
mkdir /config/auth
echo '{PRIVATE_KEY}' > /config/auth/wg.key
echo '{PEER_PRESHARED_KEY}' > /config/auth/wg-preshared.key
chmod -w /config/auth/*.key
In order to configure this interface we need to get the command line into “configuration mode”. To do so, simply enter this command on the router:
1
configure
Then, one by one, replace the placeholders and run these commands. Best way to do it is open a text editor like notepad, edit them there and then copy-paste into your console.
1
2
3
4
5
6
7
8
9
set interfaces wireguard wg0 address {PEER_ADDR}
set interfaces wireguard wg0 listen-port {SERVER_PORT}
set interfaces wireguard wg0 route-allowed-ips false
set interfaces wireguard wg0 description 'Wireguard'
set interfaces wireguard wg0 private-key /config/auth/wg.key
set interfaces wireguard wg0 peer {PEER_PUBKEY} endpoint {SERVER_IP}:{SERVER_PORT}
set interfaces wireguard wg0 peer {PEER_PUBKEY} allowed-ips 0.0.0.0/0
set interfaces wireguard wg0 peer {PEER_PUBKEY} preshared-key /config/auth/wg-preshared.key
set interfaces wireguard wg0 peer {PEER_PUBKEY} persistent-keepalive 25
Then, commit the changes and save everything so it works after a reboot:
1
2
commit
save
If you go to your router’s web interface, you should see a new wg0 interface along with your default eth0-4 and switch0 now.
Running this on your router should show an active connection:
1
sudo wg show
Now, let’s tell our router to mimic all traffic from our router like if it is coming from the same wg0 IP we just configured. The placeholder LAN_SUBNET should be your current setup. By default, it should be 192.168.1.0/24.
1
2
3
4
5
6
set service nat rule 5000 description 'wireguard-nat'
set service nat rule 5000 outbound-interface wg0
set service nat rule 5000 source address {LAN_SUBNET}
set service nat rule 5000 type masquerade
commit
save
Configure DNS to Cloudflare
Before we go ahead and send our traffic through Wireguard, we need to make sure that they’ll be able to find the VPN server by setting a DNS provider other than your ISP’s. If you already are using Pi-Hole or 1.1.1.1, you can skip this step. You can replace 1.1.1.1 with your Pi-Hole IP as well but these should do the trick for most people.
1
2
3
4
set interfaces ethernet eth0 dhcp-options name-server no-update
set system name-server 127.0.0.1
set name-server 1.1.1.1
set service dns forwarding system
Then, tell everyone connected to your router to use it as well.
1
2
set service dhcp-server shared-network-name LAN subnet {LAN_SUBNET} dns-server 1.1.1.1
delete service dhcp-server shared-network-name LAN subnet {LAN_SUBNET} dns-server {ROUTER_IP}
By default, LAN_SUBNET should be 192.168.1.0/24 and ROUTER_IP should be 192.168.1.1.
Route all traffic to Wireguard’s wg0
All right, moment of truth: let’s route all traffic through our VPN. You might want to export your router’s config a second time right now before it’s too late.
Before changing anything, let’s check what our current public IP is by going in your browser to geoip.com/whats-my-ip/ and take note of it somewhere. Good.
First, let’s make the rule (nothing to replace here):
1
2
3
set protocols static table 1 description 'table to force wg0:aws'
set protocols static table 1 interface-route 0.0.0.0/0 next-hop-interface wg0
set protocols static table 1 route 0.0.0.0/0 blackhole distance 255
Then, let’s apply this rule to everything on the router (see LAN_SUBNET from before):
1
2
3
set firewall modify wireguard_route rule 10 description 'wireguard-vpn'
set firewall modify wireguard_route rule 10 source address {LAN_SUBNET}
set firewall modify wireguard_route rule 10 modify table 1
And make them one:
1
set interfaces switch switch0 firewall in modify wireguard_route
Now, if everything goes well, your computer and every device on your home network will pass through your VPN. Let’s apply those settings and save them:
1
2
commit
save
If no one’s complaining that the internet doesn’t work anymore, you probably did it!
Testing it out
So.. now you want to know if your IP changed since last time we checked? Go back to geoip.com/whats-my-ip/ or refresh the page. If all went well, it should show your VPN server’s IP on AWS! If not, go back through the config and try again.
Let me know in the comments below how it went and what you would’ve done different. Have fun !