Raspberry Pi: Installing Proxmox VE 7 on the Pi 4

If you have Raspberry Pi at home, chances are that you like to tinker with it a fair bit installing different distros and writing images to that SD card more than you’d like to. How convenient would it be to have some sort of way to run many Raspberry Pi operating systems on a single device? All of that an more is now possible when you install something like Proxmox VE on your Raspberry Pi 4!
Disclaimer: Please use this tutorial at your own risk and make backups if any of the data on there is important to you. Nothing here is production ready!
I would suggest getting at least the 4Gb version, ideally the 8Gb to have a chance to run some virtual machines on there.
Updates from 2021-11-12:
Since RaspiOS Bullseye came out, I revisited this blog post to add some tweaks to the install process and ensure it still is relevant. Enjoy!
Updates from 2022-03-07:
The team over at Pimox did a new interactive script. I updated the post to reflect that. Cheers!
What You’ll Need
In order to have this project going, you’ll need:
- A Raspberry Pi 4 with at least 4Gb of ram. I’m using the 8Gb version in this tutorial.
- A micro-SD card with at least 16Gb of disk space. I’m using a 64Gb Sandisk Extreme.
- An SD card reader to flash RaspiOS onto.
- A USB-C power supply.
- An ethernet cable and a router/switch. It will not work over wifi.
- A computer with access to the internet.
Also make sure you’re comfortable with SSH, general router configuration and the linux command line.
Oh, and I’ll be using a Mac running MacOS for the whole tutorial so you might have to tinker a bit if you’re using Windows but nothing like a Google search or two to get you going!
What’s Proxmox VE anyways?
Before we go any deeper, let’s explain what a virtual machine, or VM, is and why you would like to have one. A virtual machine is, like its name implies, a virtual computer that you would run on a computer. Doing so would enable you to have many tiny computers living inside of a real computer. This would enable someone to run Windows, MacOS and Linux on the same computer for example. Some of you might have already installed Linux and Windows on the same computer where you could choose through a menu which operating system you wanted to boot into when you would power up the computer.
The biggest difference with virtual machines is that you can run all the machines at the same time. Both your Linux OS and your Windows OS would coexist at the same time! In the real world, virtual machines enable enterprises to run many virtual servers on a single beast of a server saving on costs and space. Heck, this website is hosted on a virtual machine! In fact, most of the internet is running on virtual machines.
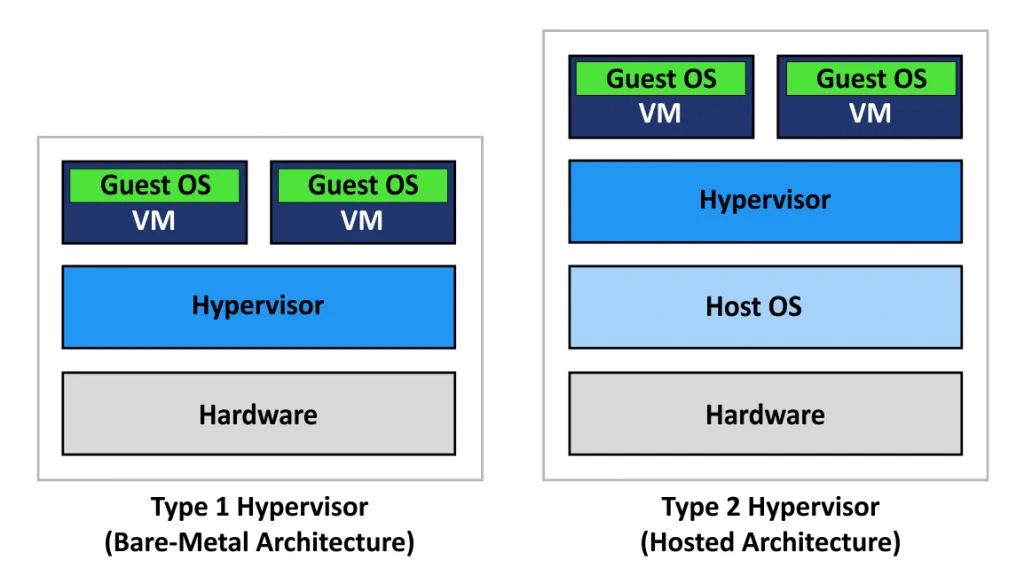
Proxmox Virtual Environment, or Proxmox VE, is what is known in the virtualization world as a Type 1 hypervisor. A Type 1 hypervisor is the closest to having a single operating system on the device, enabling virtual machines to take advantage of almost all the resources available. Examples of type 1 hypervisors are VMware ESXi, Proxmox VE or MS Hyper-V. The big advantage to running Proxmox VE is that it’s open source meaning its source code is available to everybody making it very secure. It is also free to use with no features disabled unlike other solutions that can cost thousands of dollars in licenses to use all of their features.
An other type of hypervisor you’ll find in the wild is type 2 or type 3 hypervisors. Those hypervisors are essentially programs running on your computer that enable you to run virtual machines on your system. The downside to this is that you need an host operating system to execute the program, taking more resources you won’t be able to give to your virtual machines. An example of a type 3 hypervisor is VirtualBox which is available on most platforms for free. I use it myself to run Windows 10 on my Mac without needing to venture into the dual boot nightmare.
Here’s a diagram that might help you see the difference between Type 1 and Type 2/3 hypervisors.
 Source: Nakivo
Since Raspbian OS runs on Debian (just like Proxmox VE) and that our Raspberry Pi 4 with 8Gb of ram is powerful enough to run some virtual machines on it, then why not give it a try!? Follow me through the few steps required and let’s virtualize some stuff on that Raspberry Pi!
Installing Proxmox VE 7 on the Raspberry Pi 4
Now that we all know what Proxmox is and have an idea of what is does, let’s start setting it up for our Raspberry Pi!
1. Downloading RaspiOS 64bit
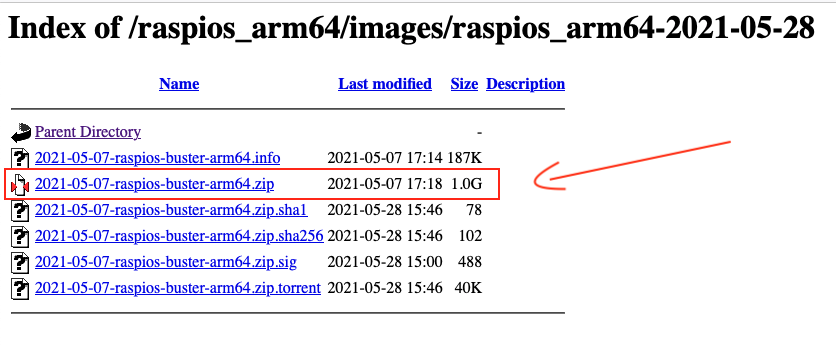
In order for Proxmox to run on our Raspberry Pi 4, we are going to need the 64bit version of RaspiOS and not the 32bit that’s available on their website. In order to get it, let’s head over to their download mirror and get their latest version. At the time I’m writing this blog, the latest version is dated from 2021-05-28.
In your browser, go to: https://downloads.raspberrypi.org/raspios_arm64/
You will need the .img file which is usually zipped and the biggest file in the folder. Download and unzip it.
2021-11-12 Update:
Just installed it using the same script with the new 64bit Bullseye RaspiOS found on that same repository and it works just as well. You will have a few more steps to do but it’ll work in the end.
2022-03-07 Update:
The team did a new interactive script. It works flawlessly. I updated links below to reflect that.
2. Flash RaspiOS onto your SD Card
In order to flash RaspiOS onto your SD card, there’s many ways you can go about it. I personnally use Balena Etcher and it is available on Windows and MacOS. The Raspberry Pi installer works as well but make sure you use your custom 64bit image you just downloaded and not the one they supply if you decide to go that route.

Here’s the Balena Etcher steps that I always do with all my Raspberry Pis:
- Insert your SD card into your computer
- Unzip the image you just downloaded if you didn’t already
- Open Balena Etcher
- Choose “Flash from file” and then the 64bit RaspiOS image file (.img)
- Choose the right removable device corresponding to your SD card. Make sure it’s the right one or you’ll lose data on that device!!
- Click on “Flash” and wait.
- Once done, close Balena Etcher.
- Unplug the SD card reader and plug it back in the computer.
- Once you get the removable device named “boot” to appear, go ahead and create an empty file named “ssh” in there. No extension, just “ssh”. I do it like so on my Mac (in a console; search for “terminal” in Spotlight):
touch /Volumes/boot/ssh && exit - Once done, eject the “boot” drive.
- Unplug the SD card reader from your computer, take the SD card and plug it in the Raspberry Pi.
- Plug your ethernet cable and then your power supply.
- Wait until the green led on the raspberry pi stops flashing for more than 10 seconds (usually takes a minute or so including a reboot).
3. Accessing the headless Raspberry Pi
If you’ve followed the steps above you might have figured out that we don’t have direct access to the Pi through a monitor and keyboard. That’s because we’ll access our headless Raspberry Pi through SSH. But first, in order to do so we need to know its IP address. There’s 2 ways to go about that: log into your router and find the IP address that what assigned to your raspberry pi through DHCP or scan for devices on your network using nmap. The default hostname for the Pi is “raspberrypi” if you go the router way. It should be pretty easy to find under the “DHCP leases” section of your router.
Of course, I use nmap most of the time. In order to do so, I simply enter this command with your current subnet and it returns to you a list of all devices that answers a ping. To simplify the search, use sudo to have the MAC address manufacturers. This way, you’ll see “Raspberry Pi Foundation” besides it. FYI: Default subnet for most home routers is 192.168.0.0/24.
1
sudo nmap -sP 192.168.0.0/24
Once you found the IP address assigned to your Raspberry Pi, you can SSH login into it (password is “raspberry”):
1
ssh pi@<the ip you found>
4. Installing Proxmox 7 on your Raspberry Pi (the easy way)
Thanks to Tim Wilkinson, there’s a little script and some software repositories that’ll do everything for you! Here’s the steps that worked for me many times already. I won’t be covering the other ways as this one is far easier and worked everytime so far for me.
4.1 Preparing the Raspberry Pi
First thing you’ll want to do is change that default password. You can do so with this command:
1
passwd
Now, let’s switch over to a root (super admin) command line to finish the install:
1
sudo -i
Before downloading, configuring and running the super script, I like to install a few things to make sure everything goes smoothly over SSH: curl and screen. I usually throw in vim as well while I’m at it. Don’t know these programs? It doesn’t matter: You’ll find out soon enough. Now let’s install them, update our system and reboot.
1
apt update && apt install -y curl screen vim && apt dist-upgrade -y && reboot
4.1.5 (Optionnal) Remove the graphical interface from RaspiOS
Since they’re not doing a light version of the 64bit RaspiOS yet, you might want to slim down your RaspiOS install to free some ressources. To do so, here’s a few steps:
1
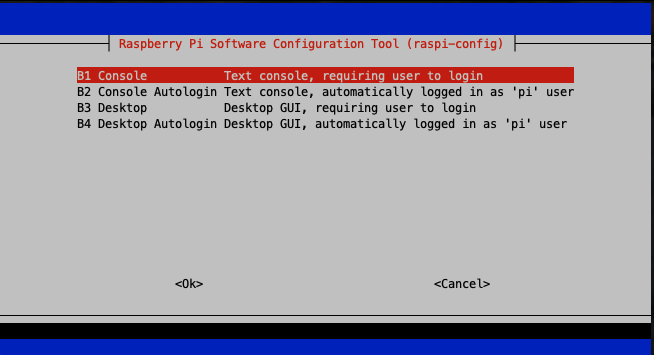
sudo raspi-config
In system options;
- under Boot/Auto Login, select Console (not the autologin one).
- under Splash Screen, select No.
- hit escape and then finish. If it asks to reboot, do so!
Then, we’ll remove all the xserver stuff we don’t need:
1
sudo apt purge -y xserver* lightdm* raspberrypi-ui-mods && sudo apt autoremove
Plain text
4.2 Downloading and configuring the Pimox install script
Ok so we have everything ready to go, let’s download the magic script from Github and change the first few lines with the settings we’d like for our soon to be Promox Pi server, aka Pimox. Please check their readme for updates, you never know!
1
sudo -i
1
curl https://raw.githubusercontent.com/pimox/pimox7/master/RPiOS64-IA-Install.sh > RPiOS64-IA-Install.sh
2023-03-07 Update:
No need to edit the file like below. I’ll leave it for posterity but you can skip to running the script directly.
And edit the first few lines with the static IP for the Pi and the hostname you’d like it to have. Let’s use vim because it’s scary to most people these days it seems. You can use nano if you prefer, I won’t tell.
1
vim RPiOS64autoinstall.sh

All we need to edit the file is press the letter “i” to go in insert mode and then use the arrow keys to go down and change the 3 values I put in that red box I drew on for you. Once done, we can save the file and quit vim using the following sequence:
1
2
3
<escape key>
:wq
<enter>
Ooof! We did it, LOL.
4.3 Headless bonus: Get into a screen session!
All that’s left is run the script but wait!! Since we’re not pluggued into the Pi directly with a mouse and keyboard, any change in network configuration will kick us out and stop the script from finishing its job. To avoid that, let’s use a program called screen that will make a special ssh session that will stay active even if we lose connectivity. This way, the install can continue when the Raspberry Pi IP changes during the install. To do so, it’s as easy as running:
1
screen -S pimox
We are now in screen, ready for battle! All that’s left to do (for now) is run the magic script, answer a few questions when they pop up and wait for the Raspberry Pi to reboot. Once it’s rebooted, you’re running Proxmox on your Pi!
1
2
chmod u+x RPiOS64-IA-Install.sh
./RPiOS64-IA-Install.sh
Once you get kicked out because of the IP address change, just wait a bit and reconnect to the pi using the new IP like so:
1
ssh pi@<new ip set in the script>
Then, you’ll be able to reconnect to the screen session using this command:
1
sudo screen -d -r
If you can’t connect back to the screen session, it’s because the Raspberry Pi has finished the install and rebooted. In any case, once it reboots, SSH back in one last time using the above command.
5. Accessing Promox on your Raspberry Pi
Ok! So your Pi just finished rebooting and has this Proxmox instance running on it. Amazing! Let’s access it in your browser using https, the static IP you configured and setting the port to 8006:
1
https://<your pi static IP>:8006
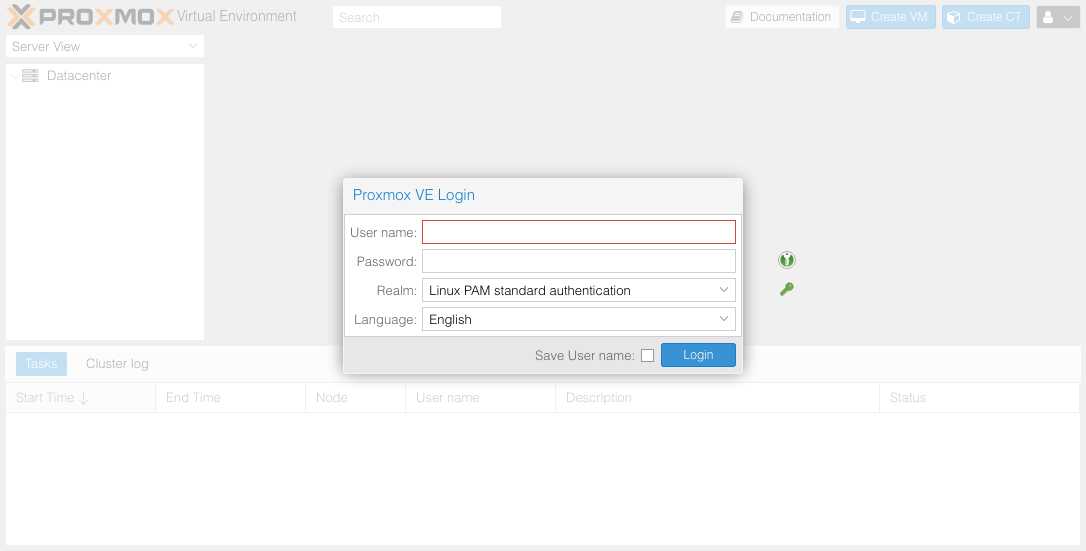
Wow!! It did actually work. Nice.
Note for RaspiOS Bullseye (on 2021-11-12): You will need to access the Raspberry Pi directly with screen and keyboard and configure the network through the command line by following step 6.2 further down this blog to make the network come back up. The script will break networking upon reboot so you won’t be able to access it through SSH.
6. Setting up the Network bridge (vmbr0)
For those of you that installed Proxmox on an x64 system, you might have realized by now that when you install Proxmox VE on the Raspberry Pi 4 it doesn’t create the network bridge interface you’ll need to give network access to your virtual machines running inside of Proxmox. Well, no big deal, let’s configure one! Here’s 2 options: from the web interface and from the command line. Choose wisely.
6.1 Configure the Network Bridge through the web interface (easier)
So you went for the easy way? All right. To do so, go to Networking configuration under your Raspberry Pi node settings in “System” > “Networking”. There you’ll see your single network card present on your Pi. Take not of its name, usually “eth0” on all the installs I did.
Then, you’ll find a “Create” dropdown above that interface name. In that dropdown the first option called “Linux Bridge” is the one you’re going to click on and configure.

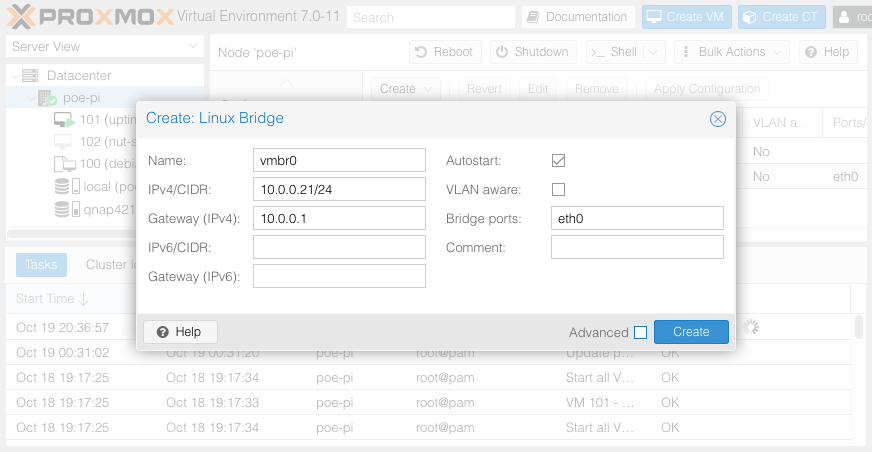
Clicking on “Linux Bridge” will show a pop-up with some fields you’ll need to fill out partially. Those fields are going to be:
- IPv4/CIDR: this is going to be the current static IP of your Raspberry Pi and usually “/24” afterwards.
- Gateway (IPv4): usually the same subnet as your current static IP but ending with “.1”.
- Bridge ports: that’s were you’re going to put that network interface name you noted. Usually “eth0”.
Then just click on “create” and then “Reboot”. Once your Raspberry Pi has rebooted, you should be able to access the Proxmox web interface again and have a “vmbr0” bridge interface to assign your VMs!
6.2 Configure the Network Bridge through the command line (cooler)
So you decided to venture into hacker territory. Excellent. First, let’s hop into a shell on the Pi, either through SSH or through the web interface. I’ll go through the web interface just because I can. To do so, on the left menu, click on “Datacenter” because that’s how we roll. Then on your Pi’s name. On the top far right, you’ll see a button called “Shell”. Click on it and if they ask select “noVNC”. There you go, an auto-login root shell in your browser! How convenient.

Since networking in Proxmox is done through one config file, all we need is edit that file and restart the network service to enable our bridge! To do so, let’s open the config file located at /etc/network/interfaces with Vim because that’s how cool we are.
1
vim /etc/network/interfaces
In there, you’ll see configs for 2 interfaces: “lo” aka yourself and most probably “eth0” (if not, adapt what’s next). In order to create our Network Bridge, all we need to do is change a few lines.
- enter “insert mode” by typing the letter “i”
- anywhere you see “eth0”, change it to “vmbr0” ( 2 lines)
- under gateway, you’ll add 3 entries
- bridge-ports eth0
- bridge-stp off
- bridge-fd 0
- above “auto vmbr0”, add another line saying “iface eth0 inet manual”
- escape edit mode by hitting the escape key on your keyboard
- write “:wq” to save the file and quit Vim
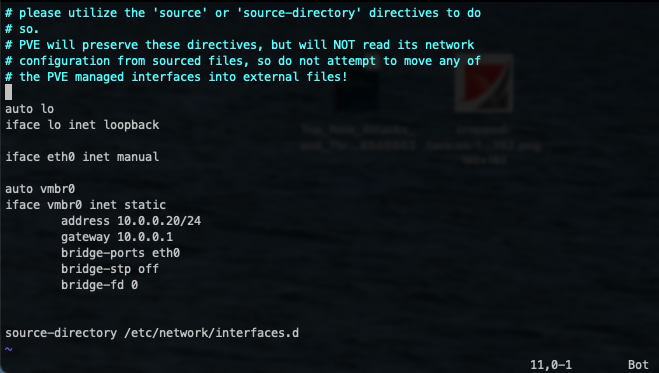
Your /etc/network/interfaces file should look like this once you’re done.
That’s it! Now you can either reboot the system or restart the networking service. To restart the service:
1
service networking restart
It should take a few seconds and complete. That’s all! You can close that shell window. Now in the web interface, you should see your new Linux Bridge named “vmbr0” that’ll share the network connection with your VMs.
Bonus: Installing your first Virtual Machine on Pimox 7
In order to install our first virtual machine on our Raspberry Pi 4 Proxmox (Pimox) install, I decided it would be nice to go with Debian. Take note that only “arm” distros can run on the Raspberry Pi.
1. Downloading Debian 11 ARM x64 install ISO
In order to install the Debian 11 ARM iso, let’s head over to their download page, scroll to the bottom of the page and click on the ISO file.
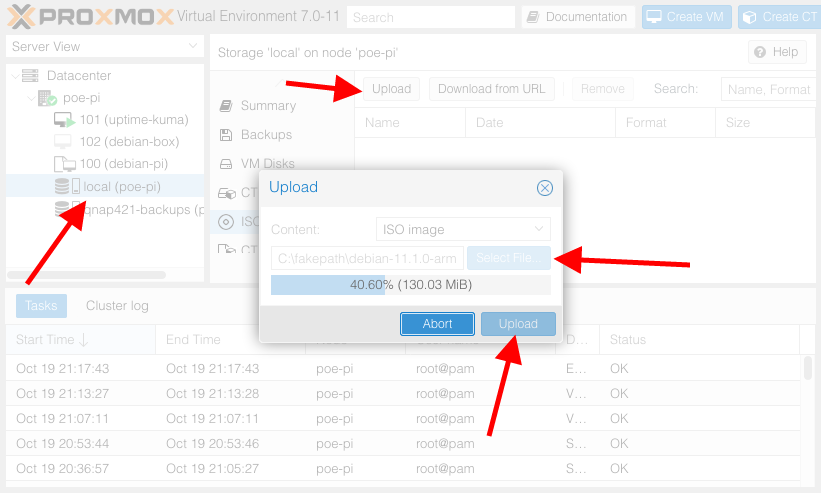
2. Upload the ISO file to the Raspberry Pi
In order to upload the Debian ISO and use it, simply go to your node’s local storage, under ISO images and upload the file you just downloaded. It’ll look like this:
3. Create a new Virtual Machine on your Raspberry Pi 4
There you are, ready to create and configure your first virtual machine in Promox on your Raspberry Pi 4. Let’s go!
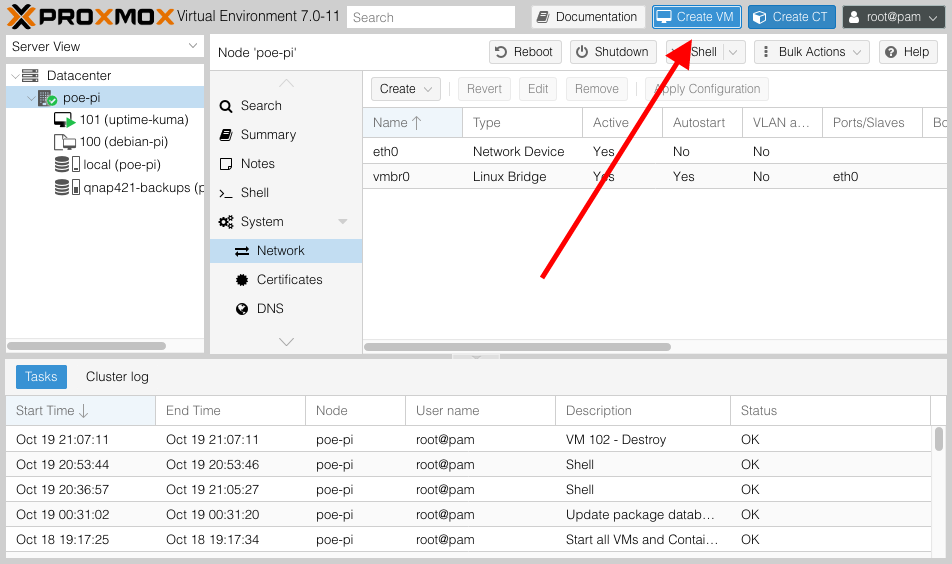 Click on “Create VM” on the top right
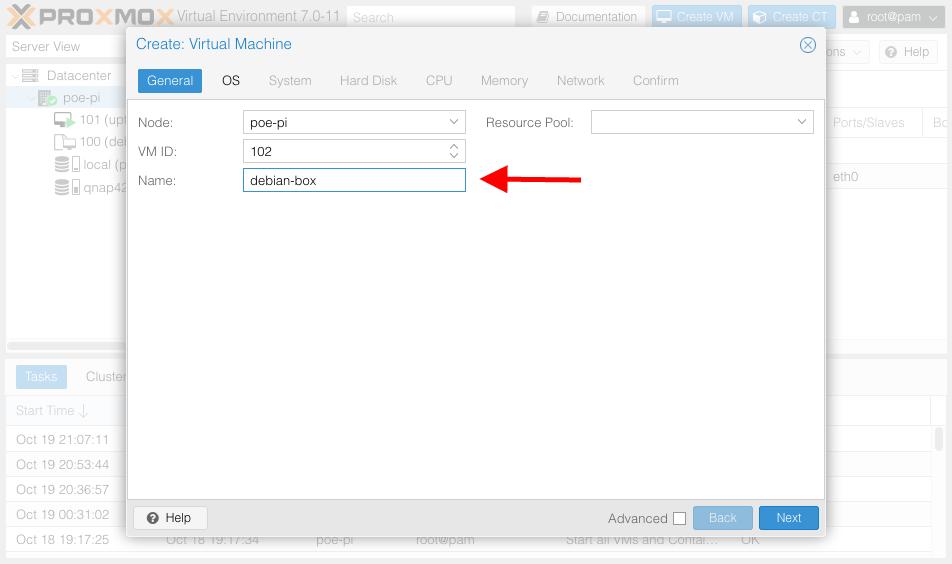 Give your virtual machine a name
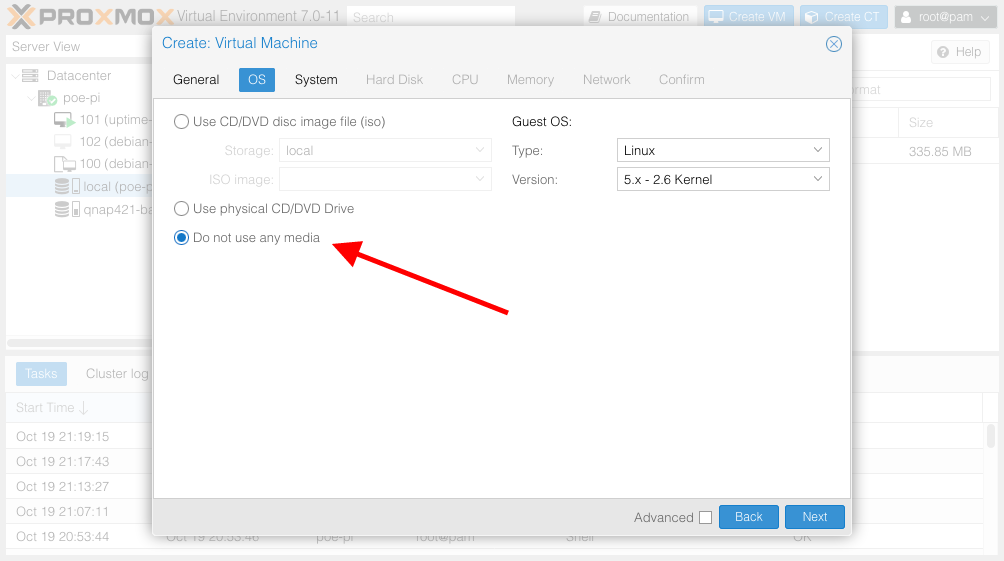 Skip the CD-Rom device for now.
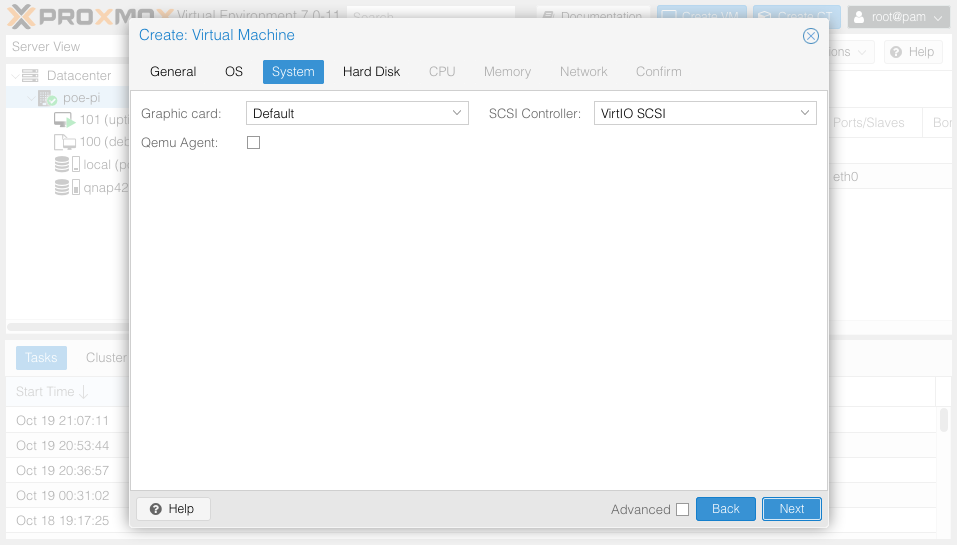 You can leave this as-is and click Next
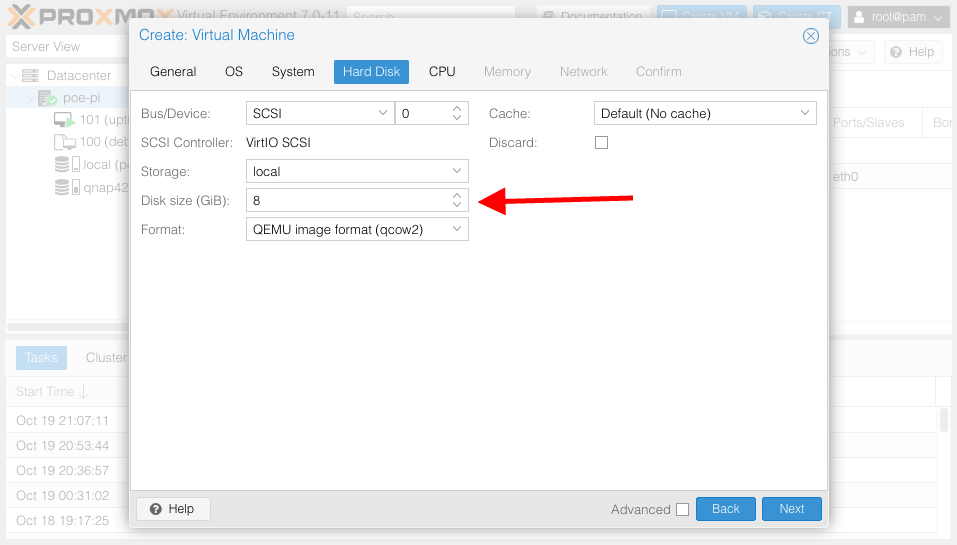 Here you can set the disk size of your VM. I chose 8Gb. You can resize this later.
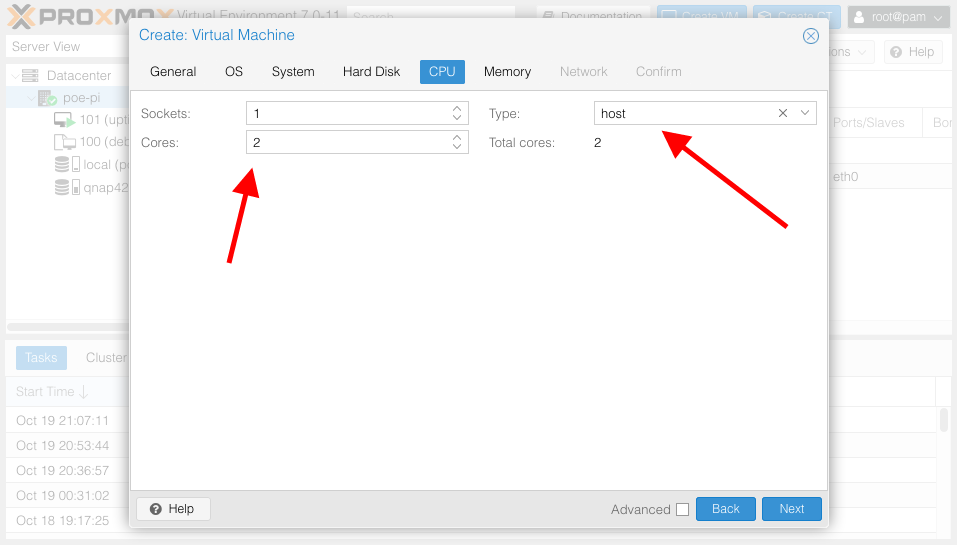 Here you get to tell how much CPU cores you want to give to this VM. I chose 2. Then select “host” for the CPU type.
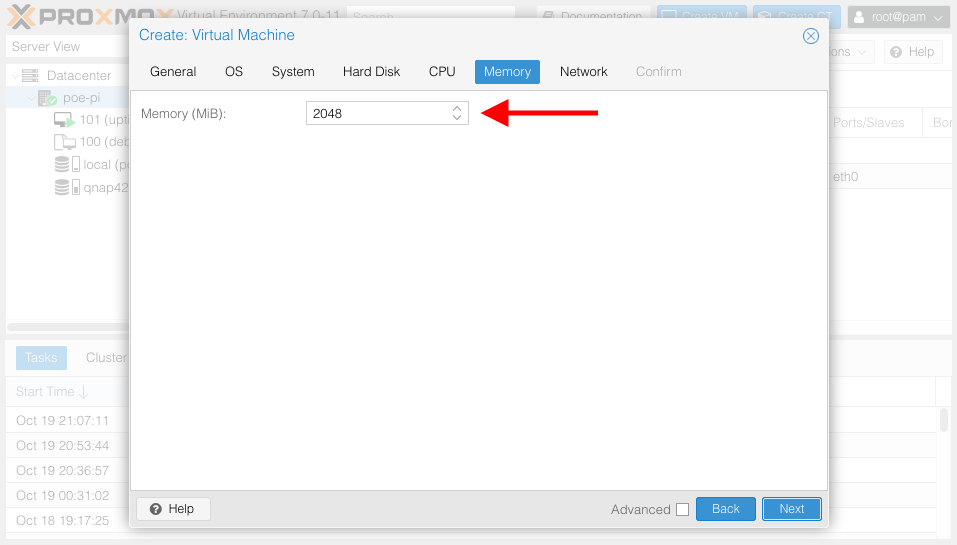 Here you can define RAM memory allocated. I left the default 2Gb.
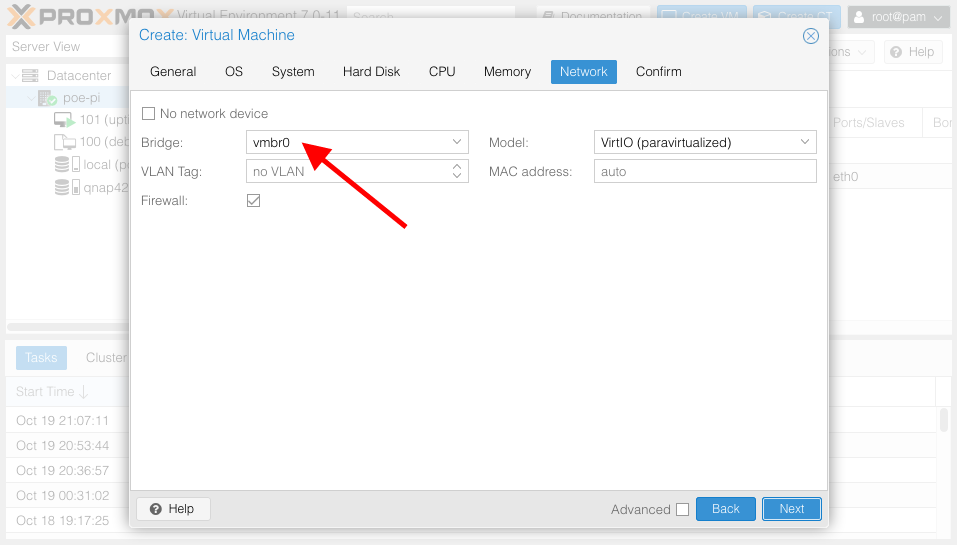 Here’s where you configure your Network card. It’ll choose the vmbr0 bridge we created earlier. Simply click on Next and create the VM on the next step.
4. Final config of the VM and first boot
In order to make this virtual machine comptabile with our Raspberry Pi hardware, we need to change a few things.
Clicking on the new “debian-box” VM on the left, under “Hardware”:
- change the bios from “SeaBIOS” to “OMVF”
- add a “EFI disk” on “local”
- remove the configured CD Drive
- create a new CD Drive on the “scsi 2” bus with the debian ISO file as media
- memory ballooning might need to be disabled in Buster. On Bullseye it seems to work just fine with it enabled!
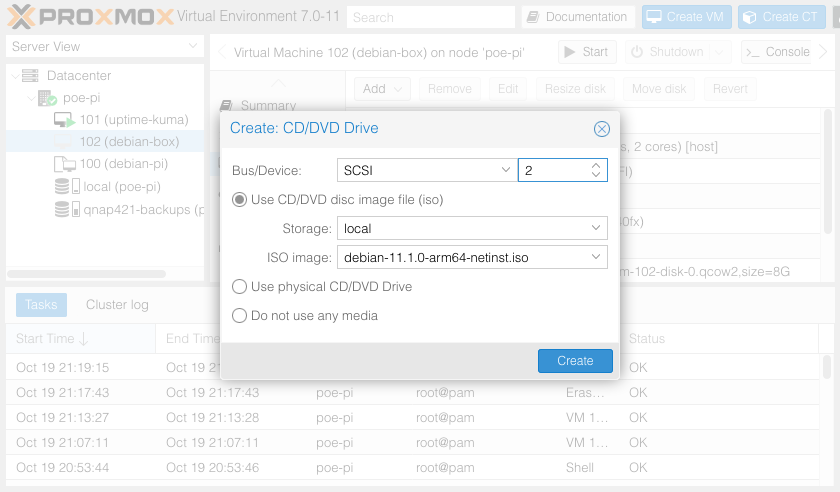 Create the SCSI CD Drive to boot Debian 11
Under “Options”:
- change the boot order to have the CD Drive at the top as the first boot device.
Final VM config should look like this:
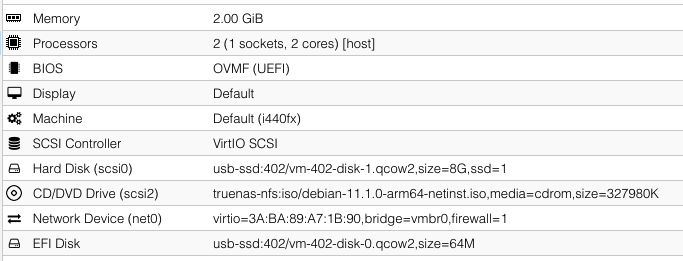
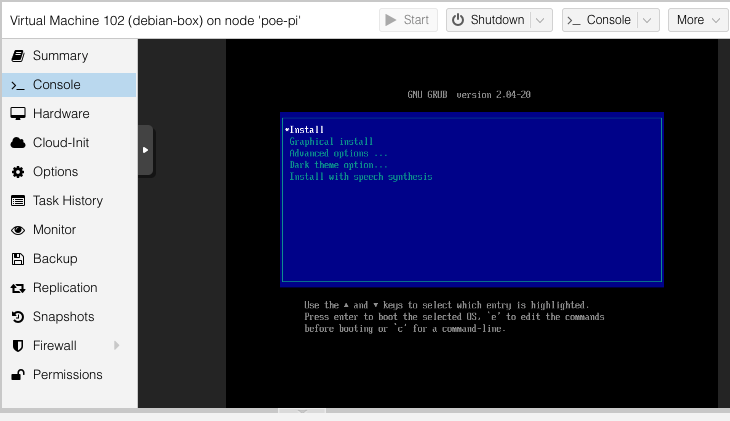
Then go into the “Console” section and hit the “Start” button at the top to start your new virtual machine. Now you can just follow the usual install steps of a Debian install! For me, defaults are usually fine.
Pro tip: enter a blank password for the root user (twice) when prompted so that you can create another user and use “sudo” instead.
Once done don’t forget to change back the boot order to make it HDD first so that you don’t get back to the install ISO.
5. Basic Virtual Machine configuration: Installing the QEMU agent
So, technically now you have a running Debian 11 install on your Raspberry Pi with a login screen and all that good stuff. There’s one thing missing though: the QEMU agent. If you’re not familiar with what VM agents do, they basically are your man on the inside of the virtual machine enabling you things like ACPI shutdowns and showing the current IP address assigned to that VM directly from the Proxmox web interface.
To install it, simply issue those classic apt commands, then shutdown, enable the feature in the VM’s options and restart the VM. Just so you know, it was already installed on my fresh install so it might be for you as well.
1
2
3
sudo apt update
sudo apt install qemu-guest-agent
sudo poweroff
If, like me, you omitted setting the root password and define a user with sudo during install, you’ll need sudo in front of the commands. If you didn’t, you might want to reinstall as root login is usually considered a bad practice. Anyways, I digress.

That’s it! You made it!!
Now, tell me in the comments: did you end up installing another distro? What are you running on your new Proxmox Node?
Until next time, hack on!