Proxmox: Create Your Own Debian 12 Cloud-Init Template

Deploying a new virtual machine in Proxmox is usally pretty straight forward but it takes too much time? In this tutorial, you’ll embark on an adventure to create a Debian 12 Bookworm cloud-init image for Proxmox using some of my nifty commands and notes. With cloud images and cloud-init, we’ll harness the true potential of virtual machines (VMs) and create customized environments effortlessly! So, get ready to deploy cloud VMs like a pro!
1. Accessing the Proxmox Host
To start our journey, let’s access your Proxmox host. Simply connect through SSH and replace pve-host-ip with the IP address or hostname of your Proxmox server.
1
ssh root@pve-host-ip
Explanation:
The SSH command allows us to connect remotely to the Proxmox host as the root user, providing access to the Proxmox command-line interface.
2. Downloading the Debian Cloud Image
Let’s obtain the Debian cloud image designed for cloud environments using the wget command.
1
wget https://cloud.debian.org/images/cloud/bookworm/latest/debian-12-generic-amd64.qcow2
Explanation:
The wget command downloads the latest Debian cloud image in QCOW2 format from the specified URL.
3. Creating the VM on Proxmox
Now, let’s create the VM on Proxmox using the qm create and qm set commands to configure the VM properties.
1
qm create 9000 --name debian12-cloudinit --net0 virtio,bridge=vmbr0 --scsihw virtio-scsi-pci --machine q35
Explanation:
qm create 9000: Creates a new VM with ID 9000.--name debian12-cloudinit: Names the VM as “debian12-cloudinit”.--net0 virtio,bridge=vmbr0: Configures the first network interface to use the “virtio” driver and be bridged to “vmbr0”.--scsihw virtio-scsi-pci: Sets the SCSI controller hardware to “virtio-scsi-pci”.--machine q35: Uses the Q35 machine type for the VM.
4. Configuring Disk and Memory
Our VM needs a disk and memory to function properly. Let’s set up the disk and resize it to a suitable size, say, 8GB.
1
2
qm set 9000 --scsi0 local-lvm:0,discard=on,ssd=1,format=qcow2,import-from=/root/debian-12-generic-amd64.qcow2
qm disk resize 9000 scsi0 8G
Explanation:
qm set 9000 --scsi0 local-lvm:0,discard=on,ssd=1,format=qcow2,import-from=/root/debian-12-generic-amd64.qcow2: Sets the first SCSI disk with ID 0 to use the local-lvm storage, with options for discard, SSD, and QCOW2 format. It imports the Debian cloud image we downloaded earlier as the disk’s content.qm disk resize 9000 scsi0 8G: Resizes the disk with ID 0 of VM 9000 to 8GB.
5. Setting the Boot Order
Ensure our VM knows how to boot correctly. Set the boot order to prioritize booting from the disk.
1
qm set 9000 --boot order=scsi0
Explanation:
Sets the boot order for VM 9000 to boot from the first SCSI disk with ID 0.
6. Configuring CPU and Memory Resources
Our VM needs enough resources to perform its tasks. Configure the CPU and memory allocation accordingly.
1
qm set 9000 --cpu host --cores 2 --memory 2048
Explanation:
Sets VM 9000 to use the host CPU model, with 2 CPU cores, and allocate 2048 MB (2GB) of memory.
7. Configuring BIOS and EFI
To enable smooth functioning, we need to set the BIOS and EFI properties for our VM.
1
qm set 9000 --bios ovmf --efidisk0 local-lvm:1,format=qcow2,efitype=4m,pre-enrolled-keys=1
Explanation:
qm set 9000 --bios ovmf: Configures VM 9000 to use the OVMF BIOS.--efidisk0 local-lvm:1,format=qcow2,efitype=4m,pre-enrolled-keys=1: Sets the first EFI disk with ID 1 to use the local-lvm storage, with QCOW2 format, an EFI partition size of 4MB, and pre-enrolled keys for secure boot.
8. Setting up Cloud-Init
Empower your VM with cloud-init capabilities by attaching the cloud-init drive.
1
qm set 9000 --ide2 local-lvm:cloudinit
Explanation:
Sets the second IDE disk with ID 2 to use the local-lvm storage, which will serve as the cloud-init drive for the VM.
9. Enabling QEMU Guest Agent
Enhance VM interaction by enabling the QEMU guest agent.
1
qm set 9000 --agent enabled=1
Explanation:
Enables the QEMU guest agent for VM 9000, allowing better communication with the VM from the host.
10. Customizing Cloud-Init Settings
Now is the time to customize the cloud-init settings according to your requirements. Access the VM console to make the necessary changes, such as network settings, user configurations, and more.
11. Creating the VM Template
In the final step, we’ll create a reusable VM template from our customized VM. This template allows us to quickly deploy multiple VM instances with the same configuration.
1
qm template 9000
Explanation: Creates a template from VM 9000, which can be used as a base to create new VMs with identical configurations.
12: Install QEMU guest agent
Now that your VM template is created, it is time to create a new VM off this shiny template you just did. To do so, I like to go through the web interface as I spend most of my time there anyways.
To create a new VM using your template:
- Navigate to your template
- Click on it from the sidebar
- In the menu on the top right, click on “Clone”
- Give the new VM a name
- Make sure to check the “Full Clone” mode
- Click on the “Clone” button
Once done, you should have a basic VM created off your template!
13. Configuring your VM before launch
Before starting your new VM, you’ll want to make sure the specs are what you’re expecting as well as double check the Cloud-init configs.
VM configs:
I usually like to configure those things in the “Hardware” tab:
- Disk size
- CPU cores
- RAM
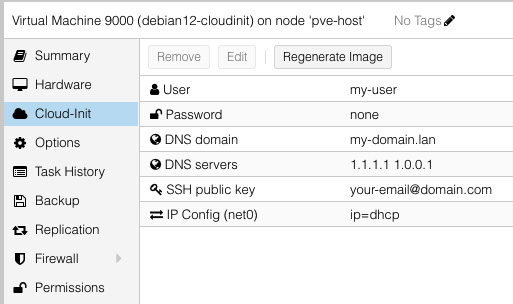
Cloud-Init configs:
I usually like to configure those things in the “Cloud-Init” tab:
- IP config (to a static IP instead of DHCP)
- DNS configs (if need be)
14. First launch!
Now you can hit the “start” button and move to the “console” section to see your VM boot up for the first time.
After a while, you’ll see a prompt where you can log-in. I usually use SSH at this point instead.
Once loggued-in, you’ll need one last thing to install to make this tutorial complete: the QEMU guest agent. To do so, simply run these 3 commands:
1
2
3
sudo apt update
sudo apt install -y qemu-guest-agent
sudo reboot
Once your server is rebooted, you should see the IP address of your VM directly in Proxmox as well as be able to use the graceful “shutdown” command and other nifty Proxmox features.
That’s it!
Congratulations! You’ve successfully created a Debian cloud-init image for Proxmox using a set of powerful commands. With your new VM template, you can now deploy customized cloud VMs effortlessly. Embrace the power of cloud images and cloud-init to unlock the full potential of your Proxmox environment.
Remember, there’s a vast world of possibilities awaiting exploration in the realm of Proxmox and cloud computing. So, go forth and continue your virtualization adventures with confidence! Happy VM deployment! 🚀